
Tips For Making Your Own Pendant Jewellery
Making your own DIY pendant jewellery is a wonderful way to express your creativity and make unique and personalised pieces that reflect your style and personality. However, it can be a daunting task, especially if you’re new to the craft. In this article, we’ll guide you through everything you need to know about making your own DIY pendant jewellery, including the jewellery findings, tools, glues, and more. We’ll also explore the pros and cons of making your own jewellery, and offer tips and advice to help you get started.
Findings Needed
The first step in making your own DIY pendant jewellery is to gather the necessary findings. These include:
Pendants: Pendants are the focal point of your jewellery piece and come in a wide range of styles, shapes, and sizes. You can choose from metals such as sterling silver or gold, or opt for materials like glass or acrylic. The choice of pendant will depend on your personal style and the overall look you’re trying to achieve. When choosing pendants, it’s important to consider the size, weight, and colour of your pendant to ensure it matches your vision.
Cameo Mounts: Cameo mounts are metal frames that are designed to hold a cameo. A cameo is a small carving or etching typically made of stone, shell, or glass. Cameo mounts come in a variety of shapes, sizes, and styles, and can be made of different metals such as brass, silver, or gold. The mount usually has a flat back that allows the cameo to be glued or set in place. Once the cameo is secured, a jump ring or bail can be attached to the mount to create a pendant.
Pendant Bails: A pendant bail is a metal finding that is used to attach a pendant to a chain or cord. A bail typically consists of a loop or hook that is attached to the back of a pendant. The loop or hook is designed to slide over the chain or cord, allowing the pendant to hang freely. Pendant bails come in a variety of styles and materials, including metal, plastic, and resin. They can be simple or ornate, and can be used to add an extra decorative element to a pendant.

When using cameo mounts or pendant bails, it’s important to choose the right size and style to match your pendant and chain or cord. Cameo mounts should be chosen based on the size and shape of your cameo, and pendant bails should be chosen based on the weight and style of your pendant. It’s also important to ensure that the cameo or pendant is securely attached to the mount or bail using glue or other methods, to prevent it from coming loose or falling off.
Jump Rings: Jump rings are small metal rings that are used to connect different components of your jewellery piece. They come in a variety of sizes and metals, and it’s important to choose the right size and metal for your project. If you’re unsure, a good rule of thumb is to use jump rings that are slightly larger than the hole in your pendant.
Chains: Jewellery chains come in different styles and metals, and can be used to create pendant based necklaces, bracelets, and anklets. When choosing a chain, consider the weight and size of your pendant, as well as your personal style. If you’re making a necklace, ensure that the chain is long enough to fit comfortably around your neck, wrist or ankle.
Cords and Ribbons: Leather cords and ribbons are another option for creating necklaces and bracelets. They come in a variety of colours and materials, and can add a unique touch to your jewellery piece. When choosing cords and ribbons, make sure that they’re strong enough to hold your pendant securely in place.
Tools Needed

Once you have your findings, you’ll need the right tools to put them together. Here are some of the tools you’ll need:
Pliers: Jewellery Pliers are an essential tool for jewellery making, and can be used for a variety of tasks, such as opening and closing jump rings, bending wire, and shaping metal. There are different types of pliers available, including round-nose, flat-nose, and chain-nose pliers.
Wire Cutters: Wire cutters are used for cutting wire, beading cord, and other materials. Choose a pair of wire cutters that are sharp and easy to use.
Crimping Tool: A crimping tool is used to secure crimp beads, which are used to fasten cords and beading wire. This tool ensures that your jewellery pieces are secure and won’t fall apart.
Beading Mat: A beading mat is a soft, non-slip surface that provides a stable work area for jewellery making. It helps to prevent your beads and findings from rolling away, and makes it easier to organise your materials.
Jewellery Glue: Jewellery glue is a specialised glue that is designed specifically for use with jewellery-making materials, such as metal, glass, and crystals. It’s important to choose a high-quality glue that is strong and durable.
Glues Needed

Choosing the right glue for your jewellery project is important for ensuring a strong and durable bond. Here are some of the most common types of glue used in jewellery making:
Epoxy: Epoxy is a two-part adhesive that creates a strong and permanent bond. It’s ideal for use with metals, ceramics, and glass, and is particularly useful when creating pieces that will be exposed to water or extreme temperatures. Epoxy can be messy to work with, and requires careful mixing and application, but it’s a reliable and durable option.
Super Glue: Super glue, also known as cyanoacrylate glue, is a fast-drying adhesive that creates a strong bond. It’s easy to use and works well with metal, plastic, and some types of stone. However, it can be brittle and may not be suitable for all types of jewellery projects.
E6000: E6000 is a popular jewellery glue that creates a strong and flexible bond. It works well with a variety of materials, including metal, glass, and fabric, and is particularly useful when creating pieces that need to be flexible or moveable. However, it has a strong odor and requires proper ventilation when in use.
Hot Glue: Hot glue is a quick and easy option for jewellery making, but it’s not as strong or durable as other types of glue. It works well with materials such as plastic and fabric, but may not be suitable for metals or glass.
How to make pendants using Cabochons
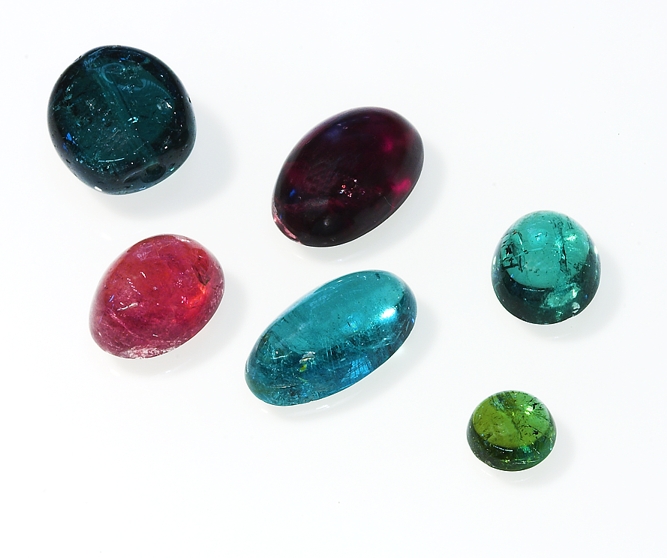
Cabochons are a popular choice for creating pendants, as they come in a variety of shapes, sizes, and materials. Here’s how to make your own pendant using a cabochon:
Materials you’ll need
- Cabochon
- Pendant tray or bezel
- Jewellery glue
- Jump ring
- Chain or cord
Steps:
- Choose a cabochon that you want to use for your pendant. Cabochons are typically round or oval, but they can also come in other shapes such as teardrop or heart.
- Select a pendant tray or bezel that matches the size and shape of your cabochon. A pendant tray is a metal frame that holds the cabochon, while a bezel is a metal setting that encases the cabochon.
- Apply a small amount of jewellery glue to the back of the cabochon, and carefully place it in the pendant tray or bezel. Be sure to centre the cabochon and press it firmly into place.
- Allow the glue to dry according to the manufacturer’s instructions.
- Once the glue is dry, attach a jump ring to the pendant tray or bezel. A jump ring is a small metal ring that allows you to attach the pendant to a chain or cord.
- Alternatively, use a pendant bail which is glued directly to the pendant such as a semi-precious stone.
- String the pendant onto a chain or cord of your choice, and your cabochon pendant is ready to wear!
You can also add additional embellishments to your cabochon pendant, such as small beads or charms. Simply attach them to the jump ring or pendant tray using small pliers or glue. Cabochon pendants make great gifts and can be customised to match any style or personality.
Pro’s and Con’s of Making Your Own DIY Pendant Jewellery
Making your own DIY pendant jewellery has many benefits, but it also comes with some challenges. Here are some of the pros and cons to consider before you start:
Pros
Unique and Personalized: When you make your own jewellery, you have complete control over the design and materials used. This allows you to create unique and personalised pieces that reflect your style and personality. You can mix and match different findings, experiment with different types of materials, and customise your designs to suit your taste. This can be particularly appealing if you’re looking for a special piece that is not available in stores.
Can Be Cost-effective: Making your own jewellery can be a cost-effective alternative to buying expensive pieces. You can often save money by purchasing findings and materials in bulk, and by reusing old jewellery components. This can be a great way to create high-quality pieces without breaking the bank.
A Great Creative Outlet: Making jewellery is a fun and creative hobby that allows you to express yourself and explore your artistic side. It can be a great way to relieve stress and unwind, and can provide a sense of satisfaction and accomplishment when you finish a project.
Cons
Requires Skill and Practice: Jewellery making requires some skill and practice, especially when it comes to using tools and techniques. It can take time to learn how to use pliers, wire cutters, and other tools effectively, and to master techniques like wire wrapping and beading. However, with practice and patience, anyone can learn how to make beautiful jewellery.
Requires Time and Patience: Making jewellery can be a time-consuming process, especially if you’re creating intricate or detailed pieces. It requires patience and attention to detail, and may not be suitable for those who prefer quick and easy projects.
Can Be Expensive: While making your own jewellery can be cost-effective, it can also be expensive if you’re using high-quality materials or investing in specialised tools. It’s important to consider the cost of materials and equipment before you start a project.
Tips for Making Your Own DIY Pendant Jewellery
Here are some tips to help you get started with making your own DIY pendant jewellery:
Start Simple: If you’re new to jewellery making, start with simple projects and work your way up to more complex pieces. This will allow you to build your skills and confidence, and avoid becoming overwhelmed.
Invest in Quality Tools: Investing in high-quality tools can make a big difference in the quality of your jewellery pieces. Look for tools that are comfortable to use and made from durable materials. It’s also important to keep your tools organised and properly maintained, as this will help you work more efficiently and prolong the life of your tools.
Experiment with Different Materials: Don’t be afraid to experiment with different materials and findings when making your own jewellery. Try using beads, stones, or wire to create different effects, and mix and match findings to create unique designs.
Consider Your Design: Before you start making your pendant jewellery, consider your design and the materials you’ll be using. Think about the size and shape of your pendant, the type of chain or cord you’ll use, and any additional findings you’ll need. This will help you plan out your project and ensure that you have all the materials you need.
Practice Good Safety Habits: Jewellery making can be a safe and enjoyable hobby, but it’s important to practice good safety habits. Always wear eye protection when using tools, and be careful when handling sharp or pointed objects. Keep your workspace clean and organised, and avoid working with materials that may be toxic or hazardous.
Making your own DIY pendant jewellery can be a fun and rewarding hobby that allows you to create unique and personalised pieces. Whether you’re a beginner or an experienced jewellery maker, there are many jewellery making tools, findings, and materials available to help you bring your designs to life. By investing in quality tools, experimenting with different materials, and practicing good safety habits, you can create beautiful and lasting pieces of jewellery that you’ll be proud to wear or give as gifts.
Comments are closed here.