
How To Make Romance Beaded Heart Pendant with Swarovski Bicones

To make this romantic heart pendant you will need to use this advanced bead weaving technique, that we have explained for you below. To get its gorgeously sparkly finish we have used Swarovski Crystals and when you have completed your design, why not finish it off by adding it to a simple chain or ribbon.
PLIERS NEEDED
2 Size 10 beading needles
Scissors
Step 1
Start by Painting one of your needles with a thin layer of nail varnish. This is to distinguish between the two needles (left painted, right not painted) so you don’t get mixed up. Make sure you let the polish dry thoroughly before starting to bead.
Step 2
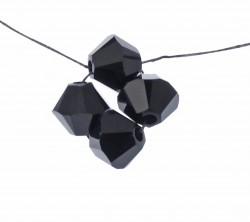
Thread the painted needle onto the left end of approx. ½ metre of thread and stick this into your bead mat for safe keeping. Now thread the non-painted needle onto the right end of the thread and pop this in your bead mat too. This is a good way of keeping everything where you want it to be in case your need to step away from your project.
Step 3
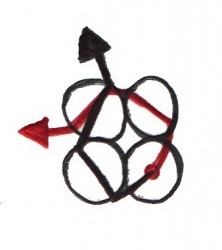
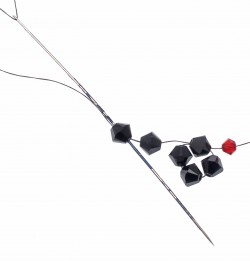
Picking up the painted needle with your left hand, thread on three 4mm Bicones, the then one 4mm Bicone onto the right hand needle but keep this one on your needle. Make sure the three Bicones drop down to the middle of your thread. Pull the single Bicone on the right needle so it is only just clear of the needle and thread through it with you painted needle in a criss-cross fashion, making sure the thread is going the other way. Now pull tight. You should have 4 Bicones in a square shape in the centre of your thread.
Step 4
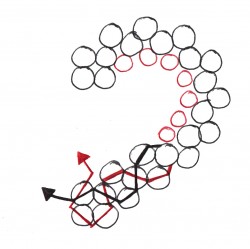
Now pick up two 4mm Bicones with your left needle and one 3mm Bicone with the right needle and move the Bicones down to meet the previous beads. Take your right hand needle and thread through the second 4mm Bicone you just added, in the opposite direction of that of the thread currently running through it. Pull Tight and swap over your needles. You should now have another square added to your first one, but with a 3mm Bicone on one side. It helps to gently flatten the beads against your bead mat every time you do a section, to make sure everything is tight and where it needs to be.
Step 5
Do this another 5 times, swapping the needles over while pulling each section tight. All the 3mm Bicones should be on the same side to create the inner curve of your heart. You will notice that each time you do a section, the beads with flip around. This is fine.
Step 6
Next do two sections in the same way but adding a 4mm Bicone in place of the 3mm.
Step 7
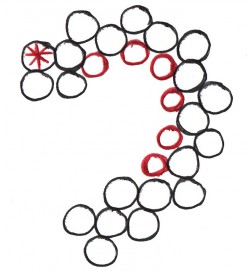
For the final section on this side, add the beads in the same way, but instead of crossing back through the second Bicone on the left hand side as you have been doing, cross through the single 4mm Bicone with the opposite needle. This will change the direction of your pattern so that you can work up the other side of your heart.
Step 8
Start the other side but adding two 4mm Bicones on the left and one 4mm Bicone on the right. Pull tight and repeat once. You should now have two matching sides at the bottom of your heart.
Step 9
Next make 5 sections with two 4mm Bicones on the left and one 3mm Bicone on the right.
Step 10
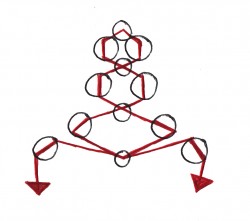
Your heart should be taking shape now that you are on the final section, this time add one 4mm Bicone on the left and one 3mm Bicone on the right. To tie the heart together, focus on the original square of Bicones you first made, move this on your bead mat so that it sits as a square in front of you, and taking your left hand needle, thread down through the top left Bicone of the square (see asterix on diagram 5 – this is the bead you will need to thread through).
Step 11
Make another heart in exactly the same way.
Step 12
Now to tie the hearts together to make them 3D. This will also make the heart really sturdy so that you can hang it from a chain or ribbon. It’s always easier to try and do the inside of the heart first or things can get a bit fiddly. You will only need 3mm Bicones for this bit.
Step 13
Lay the hearts on beside each other. Take your needle and thread down through one of the Bicones on the inside edge (it’s best to pick a 4mm to start with so you can see where you are) add a 3mm Bicone to the other needle and pass through the hole in the centre of the heart. Then on the matching bead on the other side of the heart thread down in the same direction and pull tight on both sides.
Add another 3mm Bicone to one of the needles and thread through the next bead on the opposite side. With the other needle thread through the 3mm Bicone just added and through the next bead on the opposite side. So you are criss-crossing through the opposite side of the heart, adding a 3mm Bicone as you go. It’s the same technique with the outside, but this is a bit easier as you can pick the hearts up and hook your finger through the hole so you can see things a bit closer.
Step 14
Make sure everything is pulled tight and tie the ends of the thread together
Tip: Pull each section as tightly as you can to make sure your end up with a neat end product. The technique seems very complicated at first but is basically made up of repeated sections so when you have the hang of it, it will seem really straight forward.


Comments are closed here.