
How to use Memory Wire – 3 Jewellery Design Ideas

In a nutshell Memory Wire is an alloy that remembers its original shape when stretched, making it a beautifully forgiving material to work with. You can squeeze it, pull it or twist it and the flexible little loops will bounce back into shape with no questions asked. Upon opening the packet Memory Wire will resemble a ‘Slinky’ Toy.
It commonly comes in 12 loop packs, meaning that if you so desired, you could thread beads onto the whole thing, creating a continuous 12 looped bangle. This would however take a considerable amount of time, so most people divide the loops into smaller sections.
It’s important to remember at this point that ‘Hardened Steel’ wrecks pliers! So although Memory Wire seems like a playful material, deep down its one tough cookie and will require specialist tools to cut.


Don’t let this put you off; Memory Wire Cutters are a fine investment for any beader’s tool box. Not only will they crunch through Memory Wire effortlessly, but they are also perfect for cutting chain too. This extra edition, will take on all the tough jobs with ease, allowing your other pliers to remain sharp for softer metals such as head pins and cable wire.
To further convince you that memory wire RULES, here are 3 different designs at 3 different difficulty levels….
Wine Glass Charm
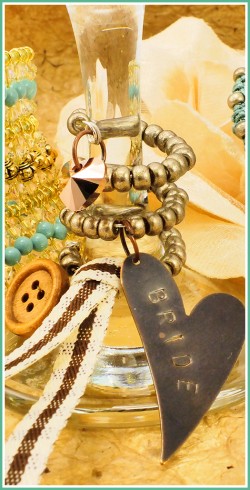
Difficulty Level: Easy
This rustic inspired Wine Glass Charm was made using 3 coils of Ring Sized Memory Wire.
Cut your desired amount of loops and use round nose pliers to turn a loop at one end. Stretch the coils out to loosen the wire and thread on beads, charms, ribbon and buttons of your choice. For this particular design we have used Size 6 Miyuki seed beads, Vintaj Altered Blanks and Rose Gold Swarovski Crystal hearts, all attached with jump rings.
Once your design is finished simply turn a loop at the other end, securing your beads in place.
Macramé Wrapped Earrings
Difficulty Level: Intermediate
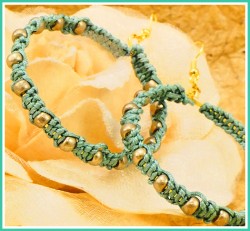
lat Memory Wire serves as a great base for fabric wrapped projects. For this earring set we have used 2 x 1 loop of Gold Flat Bracelet Sized Memory Wire.
Start by turning a loop at one end and then twist the loop 90 degrees with Flat Nose pliers (the loop needs to be facing this direction so you can hook the opposite end under it). Next, tie on a thread of your choice. We have used Chinese knotting Cord in Teal. Using the square knotting technique, weave along the loop adding a Size 6 Miyuki seed bead every 4 moves. Repeat until the whole loop is covered. Now pass the end of wire through the loop you made at the beginning. Bend it upwards and turn a loop. It is from this loop that you then attach the jump ring and Fish Hook ear wire.
Boho Fluted Bangle
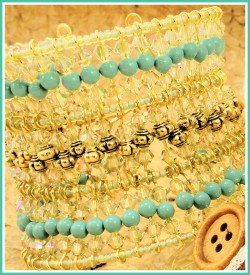
Difficulty Level: Advanced This project is not for the faint hearted, but for those who dare, the results are dazzling. What is great about this design is that it can be done with as few rows as you like. For a 1 row bangle, start with 2 x 1 loop of memory wire that slightly overlap by about an inch. Turn a loop at one end of each loop so that your beads don’t fall off when threading. You will need to make approximately 45 rows of beads on 25mm eye pins, do these in advance as you will need both hands when assembling the structure. We have used 2 x 4mm Luminous Green Swarovski Bicones and 1 x 4mm Turquoise Swarovski Pearls on each pin. To separate your pins along the wire, you will need 5g of size 11 Miyuki seed beads. Start by threading 3 seed beads then a pin, followed by another 3 seed beads and repeat. Once you have reached the end of the wire, insert your second row of memory wire, inserting 3 seed beads between each pin and secure the beads at each end by turning a loop at the end of the memory wire. For a multi stranded bangle like the one in the image, the procedure is the same, only you will need to make 3 lots of 45 eye pins. Each consecutive row must be attached to the row above. The sequence would go as follows: Row 1: 3x seed bead, 1x pin repeat Row 2: 3x seed bead, 1x pin, attach bottom loop from top row, repeat Row 3: 3x seed bead, 1x pin, attach bottom loop from row above, repeat Row 4: 3x seed bead, bottom loop of row above repeat For extra stability we have inserted a bar of 1mm Non Tarnish Craft Wire through the column of loops at both sides of the bangle. This wire has been hammered to harden the bar. If the bangle feels loose, simply attach a clasp to the bar. Helpful Links More Memory Wire Projects Kerri Mckenna In House Designer



Comments are closed here.